Installing and configuring PhyloJunction
On this page you will find instructions on how to:
do a standard installation, so that you can use its command-line and graphical user interfaces,
do a development installation (in “editable mode”) suitable for those who want to interact, customize, or expand PJ’s source code, and
build PhyloJunction using an integrated development environment (IDE), so you can navigate its code.
Requirements and dependencies
For the most part, PhyloJunction has been developed and tested on an M1-chip Apple machine (running macOS Sonoma), though it is periodically tested on Linux (Ubuntu). There is no support for Microsoft Windows.
PhyloJunction currently runs under Python 3.11 and has various Python library dependencies. Fortunately those are automatically handled by the pip installer, as shown below.
Typical user installation
Unix operating systems
PhyloJunction is hosted in the Python package index (PyPI; here), and can be automatically installed with the pip tool.
With pip installed, all that needs to be done is running the following command on the Terminal:
python3.11 -m pip install phylojunction
pip will take care of installing all of PhyloJunction’s dependencies, and will proceed to place PhyloJunction’s entry-point executables (pjcli and pjgui) and the library’s source files inside appropriate directories.
If you are running an Apple operating system and installed Python with Homebrew, pip will place the entry points in /opt/homebrew/bin and the source files in /opt/homebrew/lib/python3.11/site-packages/phylojunction.
If you are running a Debian Linux distribution, pip will normally place the entry points in /usr/local/bin if you have superuser access, and if not, in ~/.local/bin.
Source files, in turn, are placed in /usr/local/lib/python3.11/dist-packages/ with superuser access, and in ~/.local/lib/python3.11/site-packages/ without.
Development installation
On both macOS and Linux, we will start by cloning the PhyloJunction GitHub repository. Open your Terminal, go to a directory of choice, and do:
git clone https://github.com/fkmendes/PhyloJunction.git
You will see that git will have created the PhyloJunction root folder, PhyloJunction/, inside the directory you chose.
In this section you will find instructions on how to install PhyloJunction in editable mode (some might know this as setuptools’ “develop mode”), on both macOS and Linux.
When a library being installed is being locally developed, this type of installation is convenient for a few reasons.
First, an editable install will not copy all of the library’s source files and then place them somewhere as part of the installation.
Instead, it will only install dependencies and write metadata and wrapper files for library entry points (pjcli and pjgui in PhyloJunction’s case’).
Second, without the need for re-installation, changes to the library’s source files are effective immediately when the library is next imported, or when entry points are called.
This is because the environment PYTHONPATH variable will always point to the latest version of the library’s source files (see below).
Apple operating systems
The editable install is carried out from PhyloJunction’s root folder, PhyloJunction/, like so:
python3.11 -m pip install -e .
With this command, pip will place PhyloJunction’s entry-point executables (pjcli and pjgui) into the bin/ directory of wherever you Python 3.11 lives.
If Python 3.11 was installed with Homebrew, for example, that could be /opt/homebrew/bin.
Other package information files would then be placed in /opt/homebrew/lib/python3.11/site-packages/PhyloJunction-X.Y.Z.dist-info.
The -e flag tells pip to do an editable install, which further writes the path to PhyloJunction modules to, for example, /opt/homebrew/lib/python3.11/site-packages/__editable__.PhyloJunction-X.Y.Z.pth.
The last argument . tells pip where the local project directory is (where it can find file setup.py).
If file system access is denied, you can add the --user flag to the installation command, like so:
python3.11 -m pip install --user -e .
Here, pip will put the executables in a different, standard location, /Users/user_name/Library/Python/3.11/bin/.
Other package information files, in turn, can be found in /Users/user_name/Library/Python/3.11/lib/python/site-packages/PhyloJunction-X.Y.Z.dist-info
Paths to PhyloJunction’s modules will be written to /Users/user_name/Library/Python/3.11/lib/python/site-packages/__editable__.phylojunction-X.Y.Z.pth
(Note that above, user_name will be whichever your user name is.)
A third option that works as an alternative to using the --user flag is to run the following command:
python3.11 -m pip install --prefix ~/.local -e .
This option works well for those who like to keep software binaries (or symbolic links to them) all in the hidden directory ~/.local/bin.
This command will create bin/ inside ~/.local if it does not exist, and place PhyloJunction’s executables in there.
Lastly, package information files and paths to PhyloJunction’s modules will be written to ~/.local/lib/python3.11/site-packages/ and directories therein.
Note
After running these commands, do not forget to tell your operating system where to look for PhyloJunction’s executables, pjcli and pjgui.
For example, assuming you installed PhyloJunction with the --user flag, you can then add path /Users/user_name/Library/Python/3.11/bin/ to your environment PATH variable.
Alternatively, if installation was carried out with --prefix ~/.local, add that path instead.
Additionally, you will have to tell your operating system where to find PhyloJunction’s source files, which must be done via the PYTHONPATH environment variable.
The source files will be in the directory PhyloJunction was cloned to, specifically PhyloJunction/src.
The PATH and PYTHONPATH variables are normally defined in a hidden file in your root directory that gets executed by the Terminal app.
On macOS, that file is ~/.bash_profile (depending on your setup, you could also use ~/.bashrc).
In order to update the PATH and PYTHONPATH environmental variables, open ~/.bash_profile with a text editor and add the following path to it:
PATH=$PATH:/Users/user_name/Library/Python/3.11/bin
export PATH

PYTHONPATH=/path_to/PhyloJunction/src
export PYTHONPATH
Should you still want to use your current, active Terminal session, you must source ~/.bash_profile after saving and closing that file.
source ~/.bash_profile
Linux
Carrying out an editable install on a (Debian) Linux machine is not much different from what is described above for Apple operating systems.
If you have system access, you can run the following command from PhyloJunction’s root folder, PhyloJunction/:
sudo python3.11 -m pip install -e .
This command will first place PhyloJunction’s entry-point executables (pjcli and pjgui) into /usr/local/bin.
Similarly to Apple operating systems, paths to PhyloJunction’s source files are then written to /usr/local/lib/python3.11/dist-packages/PhyloJunction.egg-link.
That is it.
If you do not have system access, the second route is to try:
python3.11 -m pip install --prefix ~/.local -e .
The above command will place pjcli and pjgui into ~/.local/bin and PhyloJunction.egg-link into ~/.local/lib/python3.11/site-packages/.
Finally, in order to execute PhyloJunction it is necessary to update the PATH and PYTHONPATH variables with the paths to PhyloJunction’s points of entry and source files (see note in previous section).
Testing the installation
If installation was successful (see the Note box above), it should be possible to call PhyloJunction’s graphical (GUI) and command-line user interfaces (CLI) directly from the Terminal or shell:
pjcli # CLI
pjgui # GUI
Alternatively, users can import all of PhyloJunction’s modules within a Python session. First call Python’s interpreter, and then:
import phylojunction
Lastly, users can bypass the standalone user interfaces via a “sandbox” script (pj_sandbox.py) that can be found here.
After replacing [path] (below) with whatever the path is to the PhyloJunction/ directory, running the sandbox script can be done like so from the Terminal or shell:
python3.11 /[path]/PhyloJunction/src/phylojunction/interface/pj_sandbox.py
Building PJ on an IDE
Researchers who want to navigate or expand PhyloJunction’s code base may want to build the library using an integrated development environment (IDE). One IDE that continues to be supported on multiple operating systems is JetBrains’ PyCharm (Visual Studio Code for Mac will be retired in August 2024).
Assuming the user has a fresh install of PyCharm, the first thing to do is to open the IDE and set up a Python interpreter. This can be done by clicking “<No interpreter>” in the bottom-right corner, and then doing “Add New Interpreter” > “Add Local Interpreter” > “System Interpreter” (left menu) > Interpreter: [path to Python 3 binary].
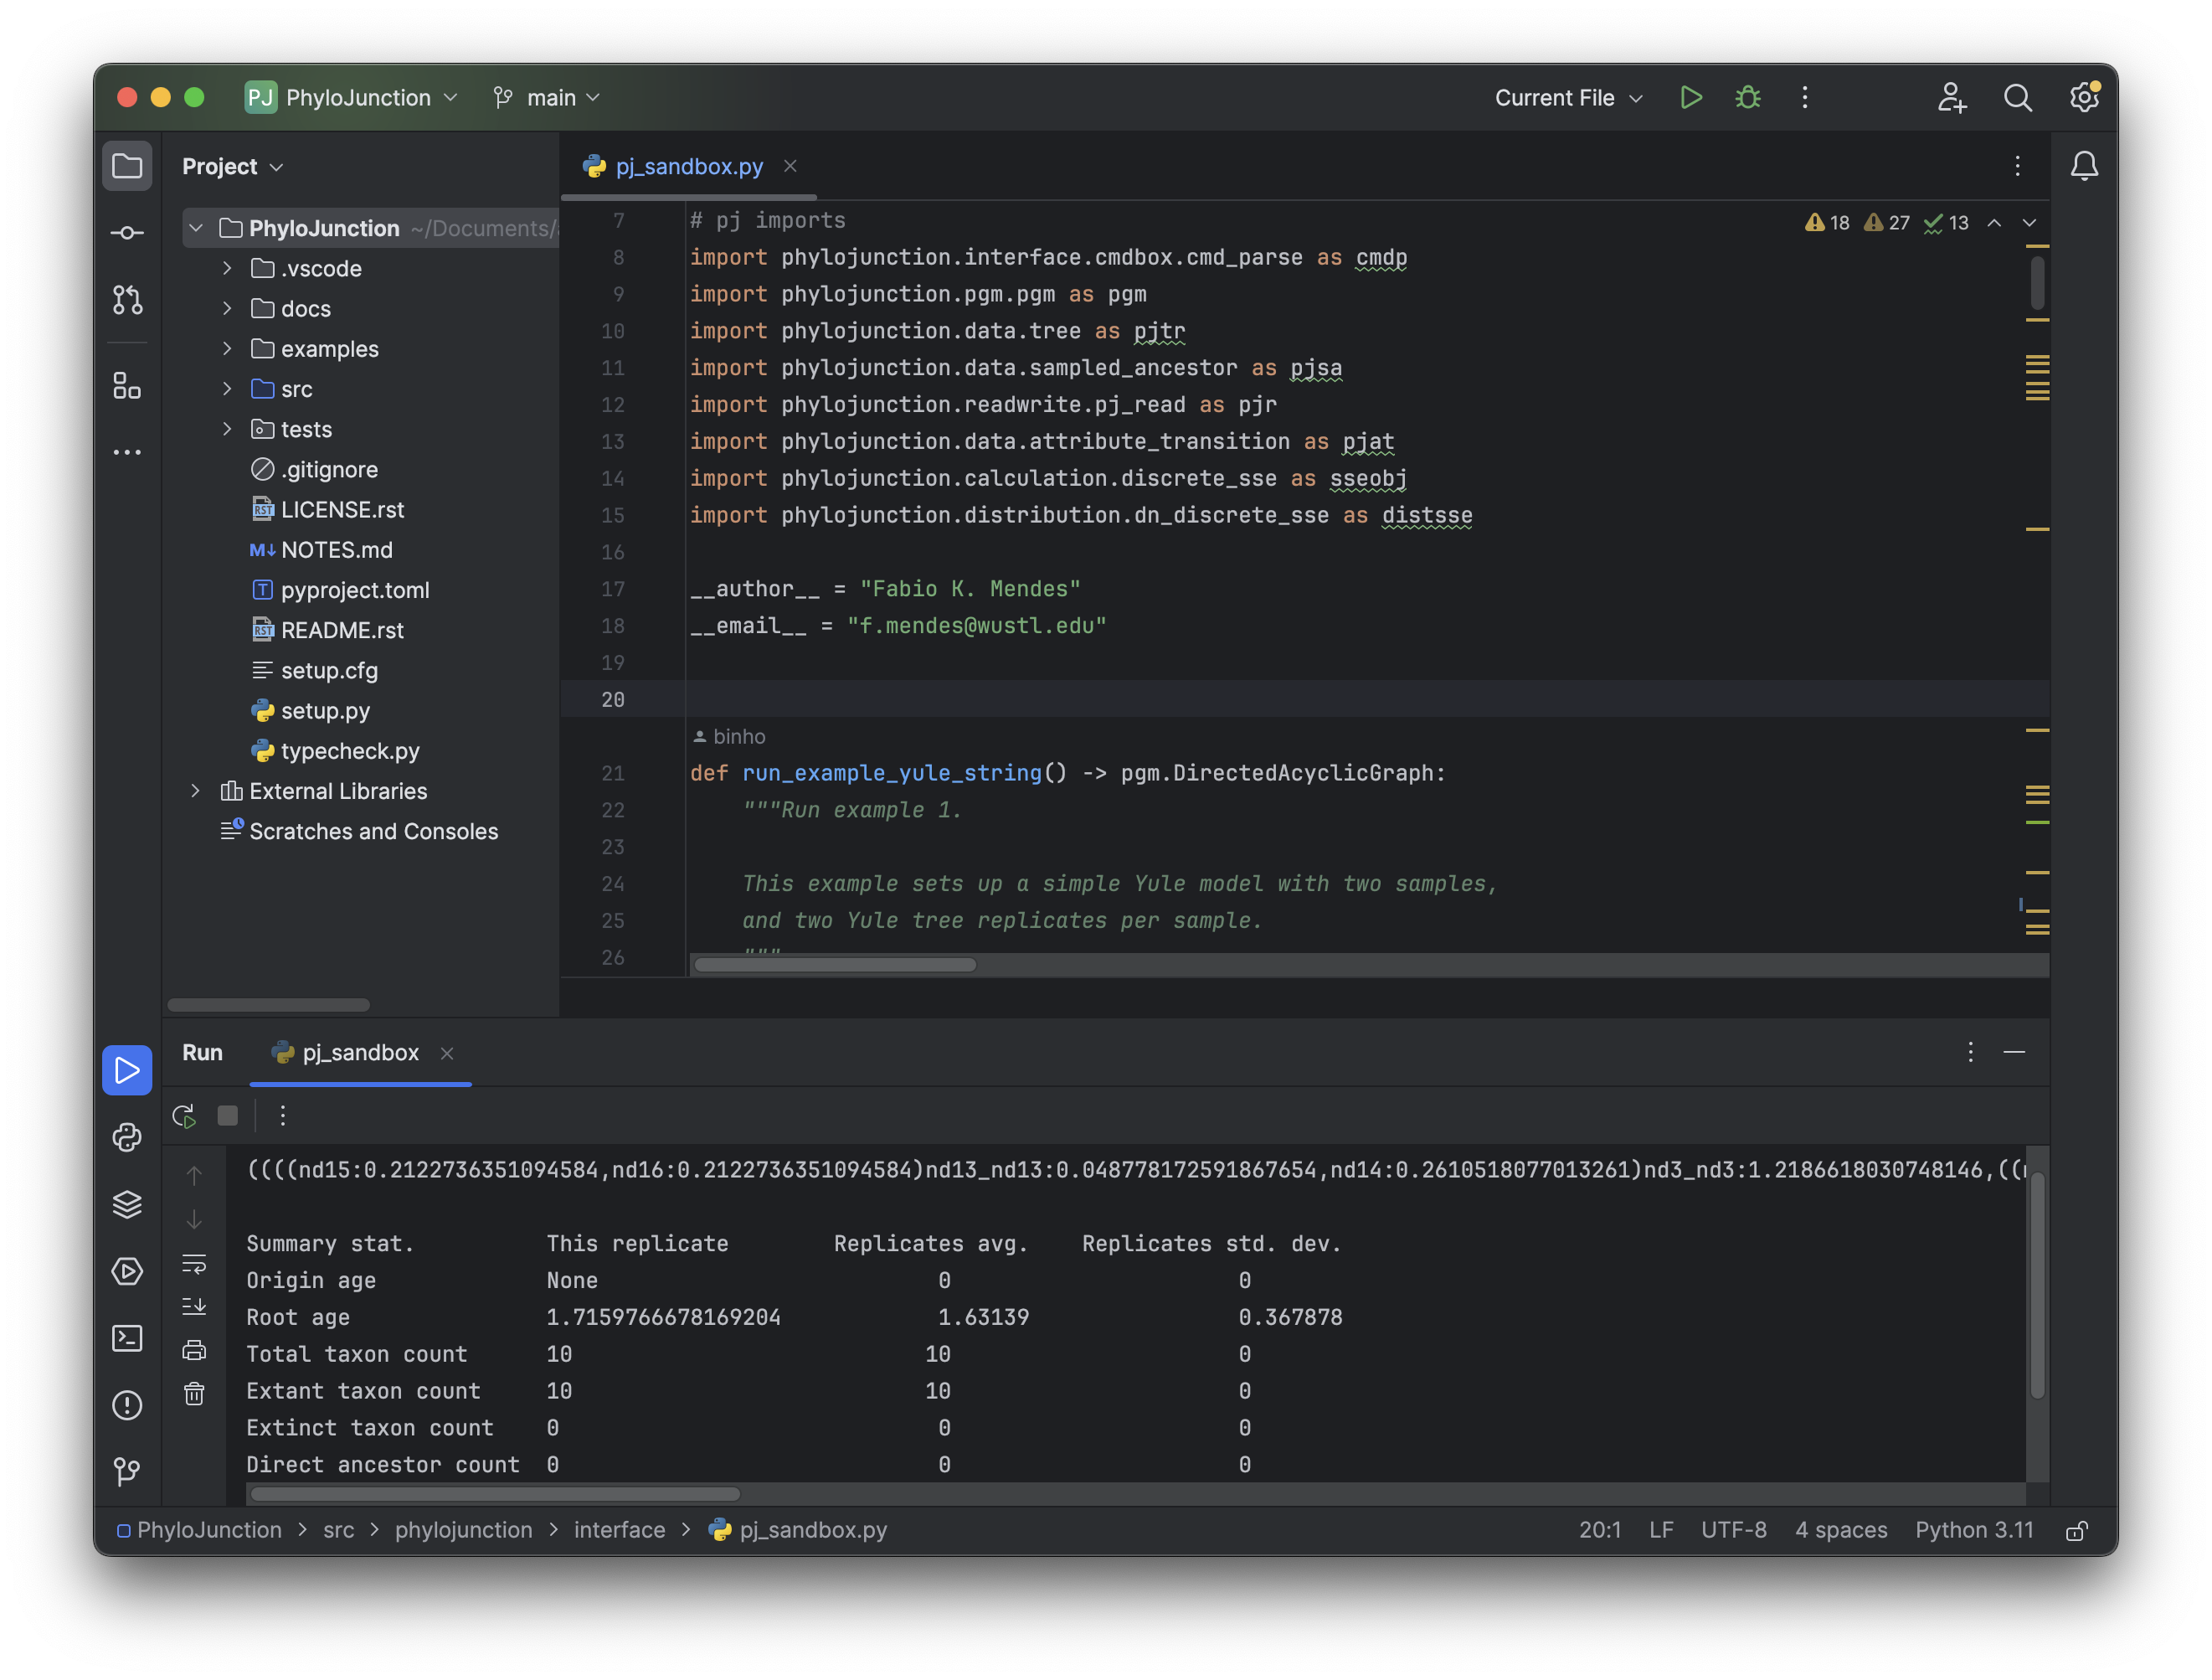
Figure 1. The PhyloJunction project after being built with PyCharm.
Then all that needs to be done is to click “File” (top-left menu) > “Open…”, and then select the root of PhyloJunction GitHub’s repository (PhyloJunction/; see Fig. 1).
If building is successful, it should be possible to double-click pj_sandbox.py (inside src/phylojunction/interface), select “Current file” from the top-right menu next to the green arrow icon, and then run the script (by clicking the green arrow).